Wednesday, 25 June 2014

Script Marked for Editing

Once you have produced a script that is ready for filming, you should also produce a marked copy that is ready for editing. By marking on your script the different shot types and techniques you wish to use, then it makes both the filming process and editing process much easier. The crew will know which camera angle to take on each point of filming and the editor will know how to cut the shots together to match the marked script. Here is an example of some marked scripts used for the purpose of editing and filming.


As you can see from the annotated script above, various abbreviations are used to stand for shot types. CU stands for close up, MCU stands for medium close up, LS stands for long shot and OTS stands for over the shoulder shot. The wiggly lines separate the different dialogue, the abbreviations noted to the left and right of the page correspond to the piece of dialogue and character within the wiggly line. Here is another example of a marked script.


In this script marked for editing, you can see how they have noted the amount of shots within the scene. It also has noted more detail on how it should be filmed. The script is marked with directions to zoom into the CU (close up shot) of the front door, it also mentions a note to the editor telling him to crossfade into the next shot. This is a very useful aspect of marked scripts as it can give the editor pointers and directions on how to cut and transition the different shots together.

Log of Rushes

A major part of the editing process is the logging of rushes. Rushes are the number of takes and the description of scenes that involve the use of the slate clapper board. A typical clapper board looks like this.

It is vital to keep track of how many takes and scenes you film in order to know which ones to edit and to use in your final piece. To do this you can create a log of rushes. Here is an example log of rushes used on a film set.
As you can see from the log above the timing of each shot is recorded in the first section. This is to ensure that the crew know how long each shot has taken and the overall duration of filming. In the second section is the recording of the scene number. It is vital this is logged to avoid confusion with the editors and rest of the crew as to what scenes have been filmed and when. This saves time in the editing stage as the editor can look to the log of rushes and find the scene and material straight away.

The shot is also listed in the log. This is to record the different shots within the same scene. The number of takes within each shot is also recorded. In the example above you can clearly see that scene 11, shot 2 had 2 takes, this is because the rushes have been clearly and neatly recorded. The next part that is recorded is the description of the shot. This is to give the editor and the crew some idea of what was being filmed in order to find footage that they want more easily. So for example if the editor wanted to look at footage where Isabel is trashing a train set, they could easily look above for the description and find the corresponding scenes and takes. The last column involves comments on the faults of the footage. If the footage is inadequate then it is marked as 'NO' and if they wish to use the footage in editing and the final piece it is marked as 'YES'.

In conclusion a log of rushes is very important in keeping track of what you have filmed and when. It details how many takes of each shot and also how many scenes you have filmed. It also lists with a simple yes or no as to whether the footage is good enough to be used in the final stages of editing and production.

Reflective Log

Within my editing work I have completed and created numerous projects. Within these projects I believe there have been things that have gone well and things that may need improving.

Blogs:

The first task that i completed for editing was to create and write an editing blog. At first i was daunted by the prospect of writing about my own individual thoughts on different editing techniques and conventions. I felt daunted because i had come into editing not knowing much about it and getting confused with all the technical jargon.

As i began to set up my blog i decided to conduct some research into the topics i was going to write about. Therefore i researched conventions, codes and types of editing in film and TV. I came across lots of video examples that i used within my blog. This taught me a lot about editing and gave me a much greater understanding of how and why it is used within the industry. I learnt about the effects different editing techniques had on a piece of film and how an edit can convey emotion to the viewer. I felt that self research and gaining a more creative understanding of editing was a very strong point for me when writing my blog.

However i do feel improvements could be made. I felt i could have included a wider range of examples to back up my points. I also think that if i was to write my blog again i would have been more calm and less daunted by the task and therefore would have written a higher quality blog. I could have also focused more on different types of editing and provided more detail on each post, this would ensure that the reader of my blog could gain a full understanding of what i was trying to explain.

Documentary Editing:

The main editing task that i completed was the editing of my documentary. The editing programme that i used for this task was Avid Media Composer. I had only basic knowledge of this software package before beginning my edit therefore i was worried about the quality and time it would take to edit.

The main strength of my documentary edit was that i gained a great deal of knowledge regarding Avid through being practical and through trial and error. I learnt how to add rolling credits, how to overlay titles onto a video background and also how to mix music and audio. I feel as if overall, my documentary was very well edited. I was creative with the way that i cut the shots together. I used a mixture of both harsh cuts and transitions as well as using music to add mood and effect.

I also came across many weaknesses during the editing of my documentary. I was very impatient when it came to using Avid. With any software packages, slow starts and unresponsive screens are natural, however Avid crashed on me a few times and i felt my patience wearing thin. To improve on this i should next time be more patient and calm if it crashes, i should also regularly save and update my work to avoid loss if a computer crash does occur. Another weakness of mine throughout the project was the speed at which i edited. I feel as if i could have researched more Avid editing techniques or short cuts in order to speed up the process and not rush last minute due to time restrictions.

Conclusion:

In conclusion i feel that i have gained a mass of knowledge and experience of editing throughout the unit. I have been practical with my work and have also used initiative to bring knowledge upon myself through research. There have been some weaknesses to my work, i feel i should have added more detail to everything that i have completed and i also need to work on my patience skills.


Post Production Report

To edit my documentary programme I used Avid Media Composer, this programme allowed me to cut and put together my film. The first step of this was to import all of my footage and create bins.

To create a bin i clicked file and new bin.
I then decided to create 6 different bins for each type of footage. I named these bins video, voice overs, interviews, titles, music and the documentary bin (overall project is located in this bin). I then right clicked into each bin and clicked import. I selected the relevant footage or audio for each bin until my dashboard looked like this.  To save the bins I simply have to
click file and save all bins.
The next step was to put footage onto my timeline. To do this I selected the first piece of footage I wanted to use in my documentary. By double clicking the footage it came up onto the left hand side of the composer. I then played the footage back to decide where I wanted it to start and end. When I made this decision I then put ‘in’ and ‘out’ points onto the footage (pressing the I key for the in point and the O key for the out point). This means that only the footage in between the two points would be cut onto the timeline. To place onto the timeline I pressed the B key. I also repeated the same process to add in music and voice overs to my video.

                                                                                                                   In and Out points


                                                                            Inserting footage onto my timeline


I then began repeating this process with all the other footage I had to put together a film. Another editing technique I used when creating my documentary was to edit in transitions. By putting transitions into my edit, the programme flows better and two different shots can be seen to merge into each other rather than creating a hard, sharp cut.


To add transitions to a piece of footage i clicked the start of the footage. A blue line then appears where i have clicked. I then clicked the box second from the far right, this box looks as if it has a gradient pattern within it.


This box then appears on the screen. . I decided I wanted a dissolve transition and that I wanted it to last for 50 frames as I felt this time was long enough to make the transition visible but still short. I then clicked add. To render effects of the transitions and any other additional effects made to my edit I clicked the button next to the transition button, which looks like a play sign next to a movie reel.


This is what a transition now looks like on my timeline. I added this transition to a piece of music to make it fade in.

also wanted to create text and titles to add to my edit. To do this I first clicked on clip then new title from the drop down menu. I then clicked the ‘title tool’ option. I then typed in the text that I wanted to put onto my video. I wanted the text to overlay onto the video footage so I kept the background as video and did not change it to black like I did for the title and credits.


I then used the ‘b’ key and repeated the process of in and out points I described earlier to add this to my timeline.

In terms of audio editing I wanted to adjust the sound levels of my voice overs to be louder than that of my background music. To do this I opened the audio mixer by selecting tools from the top menu and then clicking audio mixer from the drop down menu. A selection of mixers then appeared. To adjust the volume of just the voice over I had to look at what track number it was placed on. I placed it on A1. To turn up the volume I would simply have to drag the little square box upwards until I was satisfied.


Once I had repeated all of the above process over and over again I finally produced an edited documentary that I was proud of. The finished timeline looked like this.
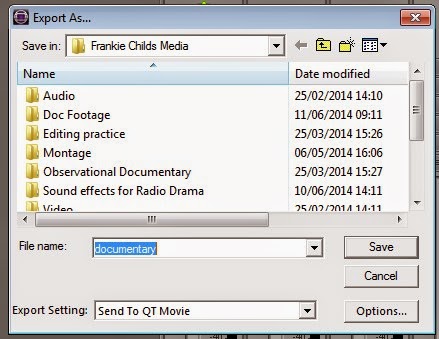


The final process was to save and export the programme. To do this I clicked file and export from the drop down menu. It then came up with this screen, I chose a relevant folder to save it to and named it a relevant name.


To finalise, I then wanted to burn the file to a disk. I inserted a blank DVD into my computers disk drive. I then found the folder in which I had previously exported my documentary too. I then clicked on the file and clicked the ‘burn’ button at the top of the menu that automatically burnt my file to disk. My documentary edit was then finally complete as i now have a physical DVD copy of my work.


Wednesday, 4 June 2014

Editing for a Purpose


There are many various purposes for editing a piece of film, from trying to inspire the viewer or just for visual effect, having a reason for editing is crucial in carrying out a vital and creative job.

Storytelling:

The whole point of a film is to tell the viewer some form of story. Therefore storytelling through editing is one of the most important purposes. You have to paint a vivid picture as to how the story is developing and make the viewer have some form of emotive connection and engagement to the piece. 

Development of drama should also be considered when editing to tell a story. The story has to start and end, therefore developments or progress should be made in order to reach the ending. A way to encourage and increase the development of drama is to use editing, techniques such as editing to a soundtrack can help higher the level of drama or emotion the viewer is feeling. Using various different camera angles and shots in a fast paced way can also develop drama, jump cuts can help create a feeling of time lapse in events, which in turn can help the story move along.

The genre of the film should be taken into account when deciding the style in which to edit. If it is a horror/thriller film such as 'The Conjuring', the editing should be slow at first, using slow cuts to build suspense, then switching to fast paced cuts of all the horror and action to create an intense feeling within the viewer. Music should be considered too, with 'The Conjuring' a classic horror style of screechy music when the action is occurring and slow drum sound to build suspense which is used to add drama. This film also uses editing to tell a story, often using parallel editing in order to show time has passed.


The clip above is also a great example of a 'motivational edit', this type of edit in its simplest form means to cut to an object or person that was not in the previous frame but then shows up to be in the same location as the previous frame. For example in 'The Conjuring' trailer, the woman is seen to be looking in the jack in the box, she then turns to see if anything is behind her and then returns to looking at the box only to find the object of horror staring at her that was not in the previous frame.

Combining shots into sequences involves using different edits and cuts of frames and putting them together to create one flowing sequence of events. This goes well with creating pace using editing. To create pace, in the example of a running sequence, upbeat and fast music should be played and fast paced cuts should be used. This scene from the German film 'Run Lola Run' has both combining shots and angles into sequences and great example of creating pace.


Key Conventions of Editing

There are many conventions and methods of editing I am now going to look at and explain different key conventions typically used.

Continuity:
This is a key convention of editing whereby a sequence is edited using various shot types that all have a flowing sense of continuity. Therefore there are no sudden jumps of objects or people and everything in the scene remains the same apart from the camera angle. This can be achieved by using the 180®  rule. This rule consists of the camera staying within a 180® section to the left or the right of a person or object. This ensures that everything in the shot stays on the same side of the frame, if this rule is broken objects or people could appear to 'flip' and objects on the right could now be seen on the left. Here is a video explaining the rule.


Montage:

Montage is the use of editing various shots or clips of a specific subject or even lots of random subjects and putting them together to create a collection of short shots. The pace of the shots interchanging is usually relatively quick in order to sustain the interest of the viewer and to help the viewer understand it is a montage not a full length film. A famous example of montage includes Sergei Eisenstein who first used the montage method in order to create 'film metaphors' by colliding pieces of footage together and editing it in a fast paced way. Here is a short clip of Eisenstein's use of montage.


Jump Cuts and Parallel Editing:

Jump cuts are used to show a slight lapse in time. It is a form of editing in which two sequenced shots of the same subject are taken from cameras that are positioned slightly different to each other. It is a jolt between two shots and makes a change compared to the softer dissolve between shots that films usually have. An example of this would be Jean-Lucs Godard's 'Breathless' in which jump cuts were first used.

Parallel editing is when an edit is made to show two or more scenes often with different locations alternating, with events often occurring at the same time to each other. This convention of editing is also known as 'cross cutting'. Classic thriller 'The Silence of The Lambs' is a great example of how parallel editing can be used to full effect, especially in this particular scene in which parallel editing is used to create suspense and a emotive effect on the viewer. 


Transitions:

Transitions are used in the editing of films to fill the space when a scene or shot switches to another. They are often used to smooth the change out however jump cutting is an exception to this. There are many different types of transitions including just a simple cut that switches straight between shot. Other types of transitions include a fade away which slowly fades from one shot to another, a dissolve which makes the scene appear to be dissolving into the next scene, a wipe transition which makes one shot slide away reveal the next shot. Types of shot can also be classed as a form of transitioning between shots including a shot reverse shot, this involves two shots of the same subjects switching back and forth quickly, often insinuating dialogue. Here is a video describing just three of the many transitions used in editing film.

Editing Rhythm and Cutting to a Soundtrack:

Editing rhythm is the use of cutting the film in a pace to keep up with the action that is going on in the piece. For example a slow cut between shots in a scene that involves something calming or peaceful gives the viewer a feeling of calm. A fast paced cut between shots can make the viewer feel threatened or full of suspense in an action film. 

Cutting to a soundtrack is also a very vital convention within editing. If a slow cut between shots is used against fast drum and bass music the overall product would not match and leave the viewer confused. A theme should be decided early on for the music, for example an action scene should be matched with dubstep or heavy music, an emotional scene should be edited to classical and soft music in order for the mood and emotive response to trigger in the viewer. 

This clip from Resident Evil-Retribution shows how rhythm editing is used to create a fast paced and dramatic effect. The cuts are very short and sharp to go hand in hand with the action occurring in the scene. Editing to a soundtrack also plays a part in this scene, a suspenseful but upbeat track is played to accompany all the action and fighting going on.


Developments In Editing Part 2

Manipulation of Diegetic Time and Space:

Manipulation of diegetic time and space is when an edit is made to a piece of film to make the subject or environment change over time. For example a person could be shown getting older therefore an edit is made to show them gradually becoming frail, wrinkly and greyer over time.
 Manipulation of Diegetic Time and Space- The Curious Case of Benjamin Button
This is a great example of the use of editing to create a sense of time and age to a person. Within the film the subject 'Benjamin Button' is getting progressively younger as opposed to growing older, this is shown by at first being old and frail to then becoming more fitter, younger and eventually becoming so young that he is a baby again.
Analogue and Digital:
Back in the early days of film all editing was analogue editing. This involved using a razor blade and a diagonal splicing block to cut and edit the pieces of film you wanted by then taping it back together again. Over the years editing has evolved with the invention of computers and computers becoming easily accessible from the early 2000's. With this digital editing has become more popular through the use of software programmes such as Avid. However these programmed computers can cost thousands of pounds. The video below shows how analogue film editing took place in the early days of film.

Digital editing is done by the process of using computerised software to cut and change footage. Editing digitally allows you to add transitions easily between shots and can also provide you with the opportunity to change the feel of the film by possibly adding colour to the shots or changing the audio to make it higher or lower in pitch.

A big development in editing came when pieces of film were no longer recorded on film reels, these reels were low in capacity with average 11 minute silent film just about fitting on to a standard size reel. If a Hollywood movie from this day and age was to be put on a film reel, it would need 5, 1000ft long reels in order to play the movie at length.

With the development of video and digital storing of movies, not only is the quality extremely more profound but the amount of space needed is very little. The digital storage space needed may be large but the physical space needed compared to huge, chunky reels is really very little.

Tuesday, 3 June 2014

Developments In Editing


Editing has changed dramatically over the last 50 years. The only way to edit in the earliest days of video was to literally cut the film and stick it back together to create an edited sequence. I am now going to look at various types of editing and how they have developed over time.
In camera editing:
In camera editing is the process of shooting a sequence in a very specific and strict order to shorten or even avoid the post production editing process.
It is a risky way of editing and can be long winded if a film switches between locations constantly. It is vital to plan out each shot vividly so that no mistakes are made  that can damage the process of not having to edit. The sequence must flow in constant chronological order.


In Camera Editing- Alfred Hitchcock's 'Rope' 
Here is a famous example of in camera editing used in the 1948 film 'Rope'. Over time in camera editing has slowly decreased in popularity due to the digital age and is now mostly used within new or amateur film makers who maybe do not have the resources or time for editing software.

Following the action:
Following the action editing is the process of following the subject or actors movements with one or two cameras in order to switch angles from time to time. It can be shot in long takes similar to the in camera editing technique however cutting is used to whittle out irrelevant content.
Whenever the subject moves the cameras will be following them. This gives the viewer a more exciting viewing experience as the action is constant and makes a change from one constant angle of filming. Shot variation is important to keep it fresh and exciting for the viewer. A range of shots should be used such as long shots, panning shots and close ups. This method of filming requires little editing therefore it has been a popular method since the beginning of filmmaking when editors did not have computers or reliable software, they could just follow the action by using different angles to make a change from the one constant long take that early filmmakers favoured.

Following the action- Louis Theroux looks at plastic surgery
This clip is a good example of cameras constantly switching angles and panning to follow the dialogue between the two subjects. In the full programme the cameras follow Louis Theroux to various different locations giving a following the action feel to the programme.

Multiple points of view:
Multiple points of view consists of showing points of view or opinions of different people.
It can be taken literal by using the camera to film the world in the point of view of the subject, showing the viewer how one particular person sees the world. Or it can be taken in a more abstract way by filming points of views of various people, these could be opinions on a specific subject like politics, or it can be more broad and set in a reality TV style such as the show Gogglebox. This is a more modern method of filming and editing as over the past 50 years the way people express their opinions have changed. Within the last 20 years or so it has been encouraged for people to have their say on things they would like to change in the world or even their opinions on new products, therefore putting it onto film has become more interesting and more popular.
Multiple points of view- Gogglebox

This programme shows various friends, couples and families watching television often declaring their opinions and thoughts on different programmes. This is a great example of multiple points of view as it uses a diverse amount of people and opinions to give the viewer an inkling into what the general public think about TV.

Shot variation:

Shot variation is the technique of using a wide range of different shot types in order to create an interesting piece of film.The main types of shot include a wide shot (establishing shot) which is often used at the beginning of the piece to show the viewer the location and scene. Long shots are shot from a large distance away from the subject often used to make the audience focus on that subject. Medium shots are often showing the character or subject from the waist or shoulders up, these are used to show dialogue or to establish characters to the audience. Close up shots are used to directly show the audience a detail that is relevant to the emotive context of the film, for example the facial expressions of a character that has just been told bad news.

Shot Variation- Mean Girls

This clip from the classic teen movie Mean Girls features an array of different shot types include medium shots, close ups, long shots and an over the shoulder shot to show dialogue between characters. It doesn't focus on one shot type for too long and interchanges between shots quickly to keep the pace of the film up.