To edit my documentary programme I used Avid Media Composer,
this programme allowed me to cut and put together my film. The first step of
this was to import all of my footage and create bins.
To create a bin i clicked file and new bin.
I then decided to create 6
different bins for each type of footage. I named these bins video, voice overs,
interviews, titles, music and the documentary bin (overall project is located
in this bin). I then right clicked into each bin and clicked import. I selected
the relevant footage or audio for each bin until my dashboard looked like this. To save the bins I simply have to
click file and
save all bins.
The next step was to put footage onto my timeline. To do this
I selected the first piece of footage I wanted to use in my documentary. By
double clicking the footage it came up onto the left hand side of the composer.
I then played the footage back to decide where I wanted it to start and end.
When I made this decision I then put ‘in’ and ‘out’ points onto the footage
(pressing the I key for the in point and the O key for the out point). This
means that only the footage in between the two points would be cut onto the
timeline. To place onto the timeline I pressed the B key. I also repeated the
same process to add in music and voice overs to my video.

In and Out points

Inserting footage onto my timeline
I then began repeating this process with all the other footage I had to
put together a film. Another editing technique I used when creating my
documentary was to edit in transitions. By putting transitions into my edit,
the programme flows better and two different shots can be seen to merge into
each other rather than creating a hard, sharp cut.

To add transitions to a piece of footage i clicked the start of the footage. A blue line then appears where i have clicked. I then clicked the box second from the far right, this box looks as if it has a gradient pattern within it.

This box then appears on the screen. . I decided I wanted a dissolve transition and that I wanted it to last
for 50 frames as I felt this time was long enough to make the transition
visible but still short. I then clicked add. To render effects of the
transitions and any other additional effects made to my edit I clicked the
button next to the transition button, which looks like a play sign next to a
movie reel.
This is what a transition now looks like on my timeline. I added this transition to a piece of music to make it fade in.
I also wanted to create text and titles to add
to my edit. To do this I first clicked on clip then new title from the drop
down menu. I then clicked the ‘title tool’ option. I then
typed in the text that I wanted to put onto my video. I wanted the text to
overlay onto the video footage so I kept the background as video and did not
change it to black like I did for the title and credits.

I then used the ‘b’
key and repeated the process of in and out points I described earlier to add
this to my timeline.
In terms of audio
editing I wanted to adjust the sound levels of my voice overs to be louder than
that of my background music. To do this I opened the audio mixer by selecting
tools from the top menu and then clicking audio mixer from the drop down menu.
A selection of mixers then appeared. To adjust the volume of just the voice
over I had to look at what track number it was placed on. I placed it on A1. To
turn up the volume I would simply have to drag the little square box upwards
until I was satisfied.

Once I had repeated
all of the above process over and over again I finally produced an edited
documentary that I was proud of. The finished timeline looked like this.

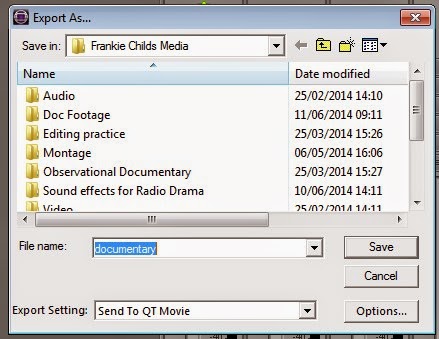 The final process was to save and export the programme. To do this I
clicked file and export from the drop down menu. It then came up with this
screen, I chose a relevant folder to save it to and named it a relevant name.
The final process was to save and export the programme. To do this I
clicked file and export from the drop down menu. It then came up with this
screen, I chose a relevant folder to save it to and named it a relevant name.
To finalise, I then wanted to burn the file to a disk. I
inserted a blank DVD into my computers disk drive. I then found the folder in
which I had previously exported my documentary too. I then clicked on the file
and clicked the ‘burn’ button at the top of the menu that automatically burnt
my file to disk. My documentary edit was then finally complete as i now have a physical DVD copy of my work.

No comments:
Post a Comment